Showing posts with label Comfort Food. Show all posts

Tuesday, October 5, 2010

Focaccia Bread

This recipe is just another great spin on the Best Yet Whole Wheat Bread!  It's lots of fun and is great to use as the bread on Grilled Veggie Sandwiches. 


Focaccia Bread

1 recipe made of Best Yet Whole Wheat Bread
4 green onions sliced
2-4 cloves garlic minced
Olive oil
Italian seasoning

Oil cookie sheet with olive oil.  Take bread dough and spread it out on the cookie sheet.(You can have bread dough rise once and then punch down and place on pan or you can just have it rise once on the pan.)  It doesn't need to be rolled smooth in fact poking it on top with your fingers so it's kind of uneven it better.  Brush with some olive oil to coat the top of the dough the spread on the minced garlic.  Sprinkle with the green onion and Italian seasoning.  You may add other seasonings if you wish.  Let rise a bit until about double.  If can be less if you don't have time it will rise some as it bakes.  Bake at 350 degrees about 20 minutes or until nice and golden brown. 

Friday, September 17, 2010

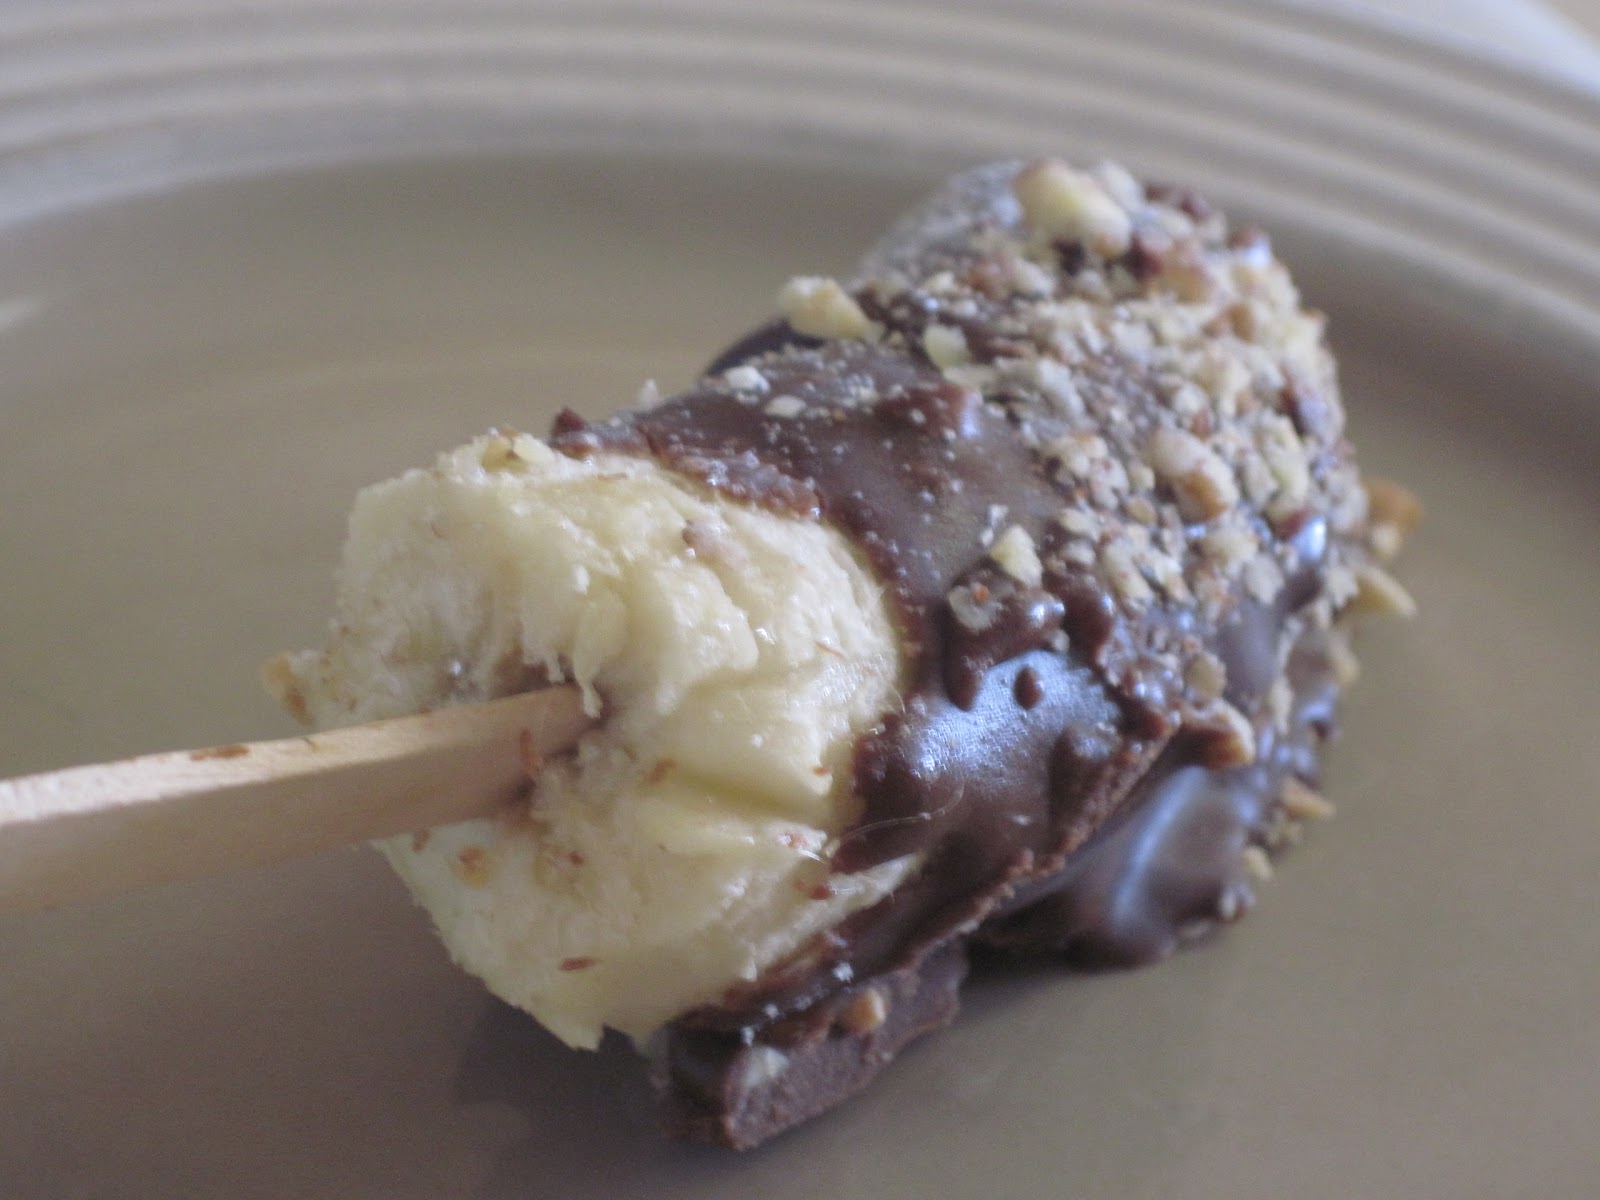
Banana Pops

Sorry for my lack of posting lately!  Just been really busy with.....well life and also Fall canning.  Oh how I love Autumn and Harvest time!  My project this week has been bottling this Spaghetti Sauce recipe.  I have done about 20 quarts (doing a quadruple and a triple batch) and hope to do about 14 more!  Then if we have enough tomatoes my daughter wants us to bottle some salsa.  Although it seems to get eaten up fresh since we like it better that way!  We may get a few pints done though!

Anyway I have been wanting to post this for a while!  It's a super fun treat that the whole family LOVES!


Banana Pops

A bunch of Bananas
small wooden craft sticks (Popsicle sticks)
My Version of Magic Shell or Truffles recipe made and still liquid
(have you noticed that those two recipes are pretty much the same;)
Chopped Nuts of choice, we like Walnuts, Pecans, or Peanuts (optional)

Peel and then cut each banana in half.  Slide about half the stick up into the flat cut side of banana.  Freeze overnight or until frozen.  Take "chocolate sauce" and coat the frozen banana with one coat and set on a tray or plate with wax paper.  Let set up putting back into the freezer for a few minutes if needed.  Then coat the bananas with a second coat of sauce.  You may add more if wanted but we usually do just two.  Right after the last coat sprinkle with nuts if desired.  Place in freezer for a few minutes until set up.  Keeps well in freezer.  Makes a great fun treat!


ENJOY!

Tuesday, September 7, 2010

Best Yet Whole Wheat Bread

Update:  I recently learned that hard wheat has enough gluten in it to hold bread together it just needs to be activated.  Lemon juice does that!  So if you don't have any Vital Wheat Gluten you don't really need it just try some lemon juice to help activate the gluten already in it!  We have tried it and it works great!  We have also substituted the honey for agave and it gave it a little lighter flavor I kind of liked it better although it's good either way!  

As far as just regular simple bread dough goes I just love this recipe!  I have tried some "other food storage" bread recipes and they tasted more like cardboard.  I pretty much use this dough for EVERYTHING;  Fry bread, (known as scones where I grew up;) rolls, soup bowls, cinnamon rolls, doughnuts, pull apart bread, pizza dough, pretzels, and of course BREAD.  You name it we have tried it with this recipe!  Again I just love how versatile it is. 

Oh and by the way my daughter is now 13 and is usually the one who makes this dough up she enjoys doing it and says if I get a bread mixer she won't use it.  She makes amazing perfect dough every time. (she says the secret is to not use too much flour if it gets sticky while kneading just oil your hands with a little olive oil) She has taught her 11 year old brother how to make it too!  Maybe I don't need that bread mixer after all! ;)  My next goal it to take this recipe and try it with other grains!

I love this bread recipe! It makes great bread bowls, yummy cinnamon rolls, and wonderful bread. It's very fool proof! I have never been a good bread maker but this turns out great every time. My 11 year old daughter made it yesterday with very little help from me. The picture is of the bread she made it turned out GREAT! She said she wants to make it again WITHOUT my help!

Best Yet Whole Wheat Bread

Hand Method: Yep I still don't have a mixer ;) (yields 2 loaves)
1/3 Cup honey or agave
1/3 Cup extra virgin olive oil
2 1/2 Cup Warm Water
1 1/2 Tablespoons Yeast
1 Tablespoon Real Salt
6-7 Cups Fresh Ground Whole Wheat Flour (I used hard white wheat)
1 1/2 Tablespoons Vital Wheat Gluten OR 1-2 Tablespoons Lemon Juice

Combine the warm water, yeast, and 2 Cups of fresh whole wheat flour in a large mixing bowl. Allow to sponge for 15 minutes. Add the honey, oil, Vital Wheat Gluten, salt and 4-5 Cups additional flour until the dough begins to clean the sides of the mixing bowl. Do not allow the dough to get too stiff (too dry). Dough should be smooth and elastic. It is a common mistake for the beginning bakers to add too much flour.
Knead the bread by hand 7-10 minutes or until it is very smooth, elastic, and small bubbles or blisters appear beneath the surface of the dough. If you are kneading by hand, be sure to add the minimum amount of flour to keep the dough soft and pliable by using a tsp of oil on your hands and kneading surface.
Form the dough into 2 loaves and put in greased loaf pans or 5-6 loaves balls if making bread bowls and place on cookie sheet. Allow to rise in a slightly warmed oven or other warm place until doubled in size (about 30-60 minutes).
Bake loaves for 25-30 minutes in a 350 degree oven. Bread is cooked through when it sounds hollow when tapped on the bottom, and when the top and sides are a golden brown color.

This Bread Recipe is VERSATILE! Use it to make cinnamon rolls, pizza, bread sticks, and more.

Tuesday, August 17, 2010

All American Apple Pie Filling

I'm so excited to share this recipe with you!!  I tried it last year and bottled it!  All year it has been so fun to have homemade apple pie filling whenever we needed some.  And I haven't had to worry if it had good ingredients!  I will be making this every year to put on my food storage shelves.  And with apple season quickly approaching I of course just had to share! 

I even used it to make my Mom's homemade Apple Crisp (healthified of course)it was a hit last year at Thanksgiving.  This summer with travels, camping and visiting family I have even come up with a quick and easy way to mix it so it's easy to travel with and makes us quickly, easily, fresh and warm!  Comfort Food at it's best!

I call it All American because it truly is!  The apples I used last year actually came from Grandpa's apple trees in his back yard.  We planted a tree a 4 years ago and we have a few apples on our tree this year we are so excited!  I tell ya, you just can't beat homemade like this.  Your family can't help but be healthier with just all the love put into it!  Also to help with more homemade ideas I'm linking up with Raising Homemakers, go check them out for lot more homemade and homemaking ideas!

Simple, Healthy, and Taaaaaasty!


All American Apple Pie Filling

18-20 cups thinly sliced apples
3 Tablespoons lemon juice
4 cups Sucanat or 2 cups Honey (may add more or less depending on sweetness of apples)
2 heaping teaspoons ground cinnamon
1 teaspoon Real Salt
1/4 teaspoon ground nutmeg
8-10 cups water

In a large bowl toss apples with lemon juice and set aside.
Pour water into a large pot on stove over medium heat.  Combine Sucanat, Arrowroot, cinnamon, salt and nutmeg.  Add to water, stir well and bring to a boil.  Boil for 2 minutes stirring constantly.  Remove from heat.  In about 6-8 sterilized quart canning jars, place filling in about 1/4 of the way up then fill the jars with the apples pressing down a little if needed be sure apples are coated with filling.  You can add a little of the filling to the top if needed.  Place lids on, can shake to coat well.  Water bath can them for about 20 minutes. 


Just in case some of you were wondering this is how I get my apples in perfect very nice thin slices.  It is great to have!  It's an apple, peeler, corer, slicer and I love it!  You can choose to peel or not.  When I make dried apples in my dehydrator I use this but don't peel them.  It makes perfect dried apples that also store well so we have apples to munch on when all our fresh ones are gone.  They are better then candy especially when you add a little Sucanat and Cinnamon!  Anyway the right tool makes my job much easier!  For making things with apples I wouldn't be without this tool!  (Notice that I place these favorite things and books I recommend in the nice little widget to YOUR right.  So they are easy for you to find.  REMEMBER I only recommend what I love and use myself and that has had value for me and my family!)

Tuesday, July 20, 2010

Fudgsicle or Frosty

This is just super fun recipe!  For Fudgsicles I use less ice and make it a little thinner and more carob to make it more "fudgy"  you may want a little more sweetener too.  Just do it to taste!  You will want to hurry and put the Fudgsicles into the freezer right after you pour them into the molds!


 Fudgsicle or Frosty

3-5 cups of ice depending on how thick or thin you want it for
 Fudgsicles I would start with three cups and go from there for Frosties
I would start at 4 cups and add more if you like it thicker.
2-4 Tablespoons raw carob powder up to 4 for Fidgsicles 2 1/2-3 for Frosty
1/3 cup natural sweetener of choice (I have used Sucanat or Agave)
1 can coconut milk
3/4 teaspoon guar gum (optional)

Blend in blender on high until smooth!

Total Time to Make: 5 Minutes (doesn't include freezing time for Fudgsicles)


When I made this and gave it to Ryan after tasting it he knew exactly what it was supposed to be like!  He didn't call it a chocolate shake he said,  "That's a Frosty!"  It must at least taste somewhat close to the "real thing!" 


It's really just so sad this little girl has NEVER had a artificial colored and flavored sugar water Popsicle, Otter Pop or the like!  She's just so deprived and looks really upset about it doesn't she!

Saturday, May 22, 2010

My Version of Magic Shell with Gourmet Vanilla Ice Cream all Gluten & Dairy Free

Update: Hey guess what I won! Check it out here! There you have it; Simple Healthy Tasty has award winning recipes! If you aren't already a fan you will surely want to become one! ;)

Mountain Rose Herbs. A herbs, health and harmony c


I was going to wait until Summer to post this recipe but I decided I want to enter it in the Mountain Rose Herbs Recipe Contest ! Thanks to their high quality affordable coconut oil and other great products I am able to make so much fun stuff! When I was a kid I used to beg my Mom to buy me some "Magic Shell!" Once in a great while if I was good and did extra chores she would buy me some. I always thought it was so cool how it would harden and you would have crunchy chocolate on top of your ice cream.

I was smart enough to know that it had something to do with the ice cream being cold that made it harden. Unlike some of the people I recently read about who think it actually knows when it is on ice cream because they tested it on other things like Fruitti Pebbles, a tennis shoe and a bowl of mashed potato's (used because when scooped using an ice cream scooper it bears an uncanny resemblance to Ice cream and they thought it would trick the Magic Shell)

Also as part of my reading I found paraffin wax was used so it would harden when on the cold ice cream. I don't know about you but I'd rather not eat or give my children wax plus all the refined sugar and who knows what else. So anyway I thought that coconut oil would do the same thing since it melts or hardens quickly depending on temperature. So I tried it and what do ya know IT WORKS GREAT!! Notice in the pictures that after a few seconds (pictures) it all hardens! Yippee! For Mother's day got to share another one of my many childhood treats with my children and I didn't have to feel guilty about it! Also you will definitely want to try the ice cream it is the best "gourmet" tasting vanilla ice cream I have ever had!


My Version of Magic Shell

½ cup peanut butter or other all natural nut butter (like almond or cashew)
6 Tablespoons raw carob powder
2/3 cup Sucanat or raw sugar, powdered fine in blender
1 teaspoon liquid soy lecithin (optional)
pinch of sea salt
½ teaspoon vanilla

Warm up the coconut oil and almond butter in a saucepan until smooth. Add the rest of the ingredients and stir until well combined and very smooth with a wire whisk. Drizzle as desired over ice cream.


Truly Gourmet Vanilla Ice Cream

4 Cans coconut milk (not light)
2 quarts of Rice milk
1 whole vanilla bean cut into 3 or 4 pieces
3 cups raw sugar or Sucanat
ice cream machine
rock salt
plenty of ice for ice cream machine

In Blender blend 1 quart of the Rice Milk with the vanilla bean pieces until the vanilla is blended well and there are no chunks. Mix the rest of the ingredients all together till smooth if the coconut milk is very thick you may want to blend it in blender first so it is well blended. Just don't over blend at too high of a speed, this causes coconut milk to separate and you will have the wrong texture! If you want your ice cream to have an added kick try adding a pinch of cinnamon and/or cardamom or to taste!Put into your ice cream maker container. Follow the instructions on your ice cream machine to freeze. Makes about 1 gallon!


Mountain Rose Herbs. A herbs, health and harmony c


Oh P.S. ;) For all you Raw Foodies out there if you just barely heat the carob sauce or put it in a double boiler so it just gets warm not hot you can potentially have it be all raw. As for the ice cream I'm sure you can make your own raw coconut milk out of Young Coconut milk. Then you could use raw almond milk and raw agave for the sweetener. If you try it let me know how it turns out!

Saturday, May 8, 2010

Mango Mouse and Berry Parfait

I know I bring this to the front of my blog at least yearly! I probably always will so just get used to it! It's one of my very favorites!! And it's a great time to be making these again! I think it will be fun to try with fresh raspberries and strawberries this time! If you haven't tried them you are missing out! They are Simply Heavenly!!!

Mango Mousse and Berry Parfait


4 Cups Fresh Mangoes
4 TB Melted Coconut Oil
1 teaspoon Vanilla
Zest of one small lime
Juice of one small lime
1/2 Cup Agave or Pure Maple Syrup
Pinch of Salt
1 Cup Berries (I used strawberries can use any mixture of fresh berries you want)

Blend all ingredients except for the Berries and a cup of the mango in a food processor or blender until smooth and creamy. I slowly added the melted coconut oil while blender was running so it would mix in well before it started setting up. After it is all mixed and creamy, transfer to a bowl and then Chill it in the fridge for at least 1-2hrs or overnight. Fill the cups with a layer of the mousse, a layer of fresh sliced mango, then another layer of the mousse, then a layer of fresh berries and so on until full. Top with a layer of fruit and fresh mint leaves.

This is so good an instant favorite!

Wednesday, March 24, 2010

Onion Rings

I know what your thinking. How on earth could these be healthy! Well just look at the ingredients, it's all good food and just be sure that it is coconut oil (learn how to get your own high quality affordable coconut oil here) that you fry them in. It is one of the only oils I know of that is heat stable. Meaning it keeps it's true form. Most other oils when heated very hot become unstable, basically their molecular structure can change and they actually become carcinogenic or worse. So because of that I only fry with coconut oil! Also coconut oil is a great source of good fats and has lots of health benefits for more info I suggest The Coconut Oil Miracle. So with that all said I will say that I probably don't recommend you eat these every night but if you are craving them just know that I had no problem with posting them here on my Healthy blog!


Onion Rings

1 cup chickpea flour
1/2 teaspoon coriander (optional)
1 teaspoon sea salt
1/2 teaspoon chili powder
2 cloves garlic minced
3/4 cup water
1 large onion sliced
coconut oil for frying

Mix together the dry ingredients, add water. Feel free to add more water or flour if you don't think it's the right consistency. It should be thicker then pancake batter but still batter like! ;) Separate the onion into individual rings, dip in the batter coat well and fry in already heated coconut oil. Put on plate with paper towel to cool.

Notes: I ground my own dry garbanzo beans (aka chickpeas) in my Wonder Mill I had to put them in slowly but it worked great. Be sure to read your instruction manual on your grinder before trying this. Most mills should be able to grind dry beans and I'm sure a hand grinder would work as well. Also I think frying other veggies in this batter would be really tasty and a great way to get your picky eaters to eat more veggies. I bet broccoli, cauliflower, round sweet potato, zucchini, and carrot slices would all be good! Enjoy!

Thursday, February 25, 2010

My Version of Spumoni

What is Spumoni you ask? Well I didn't know until I made an Italian themed dinner for Valentines! This was our dessert! Another instant favorite! I of course put my own spin on it. Click here if you would like to know more about Spumoni! Not the epitome of health food so I did my best to healthify it to fit the Simple, Healthy, Tasty lifestyle! It turned out pretty dang good if I do say so myself!
ENJOY!


My Version of Spumoni

1/2 gallon (2 quarts) Vanilla Ice cream, divided (recipe below)
1 recipe My Favorite Whipped Creme, divided
1 pint of fresh strawberries
Truffles recipe (made but still liquid)
1 large bread pan lined with plastic wrap

The Vanilla ice cream can be freshly made or frozen and then slightly softened. Take half of it and mix with half of My Favorite Whipped Creme. Wash and take the tops off all the strawberries and pulse in blender or food processor. Add to the ice/whipped cream mixture. Pour into bread pan freeze until firm. For the next layer take the other quart of vanilla ice cream and the rest of the whipped cream and mix together. Then take the liquid truffle recipe and slowly pour and then stir so it will harden into little truffle flecks in the ice cream. I did not use the entire batch of truffles I used the rest to make "Chocolate" Dipped Strawberries! Also I used natural peanut butter instead of the almond butter in this recipe cause I wanted a kind of peanut butter/chocolate flavor. It will be good either way though! But feel free to do whatever you want! Take your bread pan with the Strawberry layer out of the freezer and add the Truffle layer on top. Freeze until firm let soften a little before turning onto a platter, slicing, and serving! Makes a pretty, tasty, dessert that EVERYONE will love!

Note: You could put cherries in the place of the strawberries and add a pistachio layer it would be a little more authentic! ;) Also the ice cream recipe makes more than 1/2 gallon so you will have some left over! That's great news isn't it! ;)

Wednesday, February 24, 2010

Vanilla Ice Cream


Vanilla Ice Cream

2 Cans coconut milk (not light)
1 quart of Rice milk
2 Tablespoons Vanilla
2 cups raw sugar or sucanat
ice cream machine
ice cream rock salt
plenty of ice for ice cream machine

Mix first 4 ingredients all together till smooth if the coconut milk is very thick you may want to blend ingredients in blender first so it is well blended. Just don't over blend at too high of a speed, this causes coconut milk to seperate and you will have the wrong texture! Put into your ice cream maker container. Follow the instructions on your ice cream machine to freeze.
Mighty Tasty!

Monday, February 1, 2010

Maple Pecan Pull Apart Bread

I came up with this because we made some flat bread for a curry dish we were having and had lots of left over dough. Ryan is still MmmmMMmmmmin over these! They are lots of fun to make and eat! Super easy but look like you worked really hard because the bunt pan makes them turn out so pretty! A instant favorite at our house. I think next time I will try putting some carob chips in the center of each roll! If you want them gooier don't be afraid to make up more maple sauce.


Maple Pecan Pull Apart Bread

Bread Dough
1 cup coarsely chopped pecans
1/2 cup Sucanat (divided)
1/3 cup maple syrup
1/3 cup melted coconut oil (divided)
1 teaspoon maple flavoring
1 Tablespoon cinnamon

Grease a bunt pan with coconut oil. Layer pecans nicely in the bottom of the pan. In a bowl mix 1/4 cup of the Sucanat with the maple syrup and 2 Tablespoons of the melted coconut oil. Add the maple flavoring. Mix well. Drizzle a little of the maple mixture over the pecans. In another small bowl mix the other 1/4 cup of Sucanat and the cinnamon together. Roll bread dough into walnut sized balls. Dip them in the melted coconut oil then roll them in the cinnamon mixture layer in the bunt pan. After each layer drizzle more of the maple mixture on top. Keep layering until the pan is just over half full. (Remember this will rise) When done you can pour the rest of the oil, cinnamon mixture and maple mixture evenly over the rolls. Let rise in a warm place until double. Bake at 350 degrees for 30-40 minutes or until done. When done let cool for just a minute then turn over onto a platter. Pull apart and ENJOY!

Friday, January 15, 2010

Burrito Casserole

This is a super easy casserole my Mom used to make. Of course I healthified it! It has been an INSTANT favorite with the kids AND the hubby! For the burritos I have made my our in whole wheat tortillas with rice, beans and seasoned to taste. Or I have used the ones in the picture below. Using the Amy's Burritos is definitely faster but NOT cheaper. We also found that the casserole made with the homemade burritos was also more filling! Not exactly sure why but it was!


Also note that the picture above is of a halved recipe in a 9x9 square pan. The recipe is for the larger rectangular baker.


Burrito Casserole

6-7 Burritos, sliced into 1 inch slices
1/2 cup Vegenaise
1 Tablespoon Fresh Lemon Juice
1 can diced green chilies
Some Cheezy Sauce made thinner with a little rice milk

Make up the Cream of Something Soup. Set aside, mix together the Sunflower Seed Sour Cream, Vegenaise, lemon juice, and diced green chilies.
In a large rectangle baking dish place the sliced burritos to cover the bottom of the pan.
Mix together the soup and sour cream mixture. Pour over the burritos in the pan. Drizzle with some Cheezy Sauce. Bake at 350 degrees for 20 minutes or until it bubbles and is hot in the middle.

Saturday, October 31, 2009

Veggie Goulash

Whether you're feeding a crowd
or want lots o' left-overs...
this yummy recipe is super
easy and it makes a lot.
You can also use only canned
veggies for a complete
'food-storage' meal.
But....fresh is best...
if ya got it.


Veggie Goulash

1 medium onion, chopped
2 large carrots, diced
1 bag frozen corn
1 yellow bell pepper, chopped
1 small head of broccoli, chopped
1 can garbanzo beans
1 can olives sliced
1 can pineapple tidbits
{whatever other veggies you like}
2 cans tomato sauce
1/4 cup ketchup
3 Tbsp. Agave Nectar
4 cups cooked brown rice
3 cups cooked whole wheat/spelt pasta.
salt and pepper, to taste
1 cup raw cashews (optional)

In a very large frying pan
put 1-2 Tbsp. of coconut or olive oil.
Add onions and cook until tender.
Add all the other vegetables and cover
cooking until desired consistency.
Add pineapple and
all the rest of the ingredients.


Mix well.
Cook until completely warmed.


Enjoy it all week long!


Friday, October 16, 2009

Snickerdoodles

Sorry I don't have a picture of these. My camera a computer don't always cooperate with me! ;) But we made these this week and they are super tasty! My sister give me this recipe last year around Halloween time and I finally pulled it out to give it a try! Ummm let's just say they were a HUGE hit! We are sorry we didn't try them sooner! They would make a great Halloween treat and go really well with the Pumpkin Pie Ice Cream! Thanks Em!!!!


Snickerdoodles
Ingredients:

1 1/2 cup ground soft white wheat flour
1/2 cup pure cane sugar or Sucanat
1/2 teaspoon baking soda
1/2 teaspoon sea salt
5-7 tablespoon coconut oil
1 tablespoon vanilla
1 tablespoon real maple syrup
1 egg replacer
cinnamon and cane sugar for coating

Directions:

Mix dry ingredients in a bowl. Mix wet ingredients in measuring cup (make sure they're blended well). Stir wet ingredients into dry ingredients. Using hands, form dough into a big ball. (If it sticks together well, then its the right consistency. If not, then add a bit of water and mix it well.)

Form dough into cookie sized balls and roll into cinnamon/ cane sugar mixture. Place on ungreased cookie sheet. Flatten each ball a little bit. Bake at 375 degrees for about 7 minutes.

Friday, April 3, 2009

Yummy Potatoes (AKA Funeral Potatoes)

Alright I hope you are all excited as I am to have a Healthy Yummy Potatoes recipe! Now like most healthy things don't expect it to taste EXACTALLY like it's unhealthy counterpart! But you can expect it to be very Tasty and just as comforting! My whole family LOVES it! I hope you enjoy it too!


Usually I just make hashbrown from potatoes using my salad shooter. But for Yummy Potatoes the frozen ones are so much more Simple and work better! This is the kind I buy!

Why? Because all that's in it is Potatoes! I like that! What does the lable on your frozen hash browns say?

Also I really like this Rapunzel brand Vegetable Broth. It is a powder it doesn't have MSG and artificial ingredients. It stores easily and if I need vegetable broth it super simple!


Yummy Potatoes

3/4 of the package (shown above) of frozen hash browns
1 recipe Cream of Something Soup
1 recipe Sunflower Seed Sour Cream (3 parts of recipe 1 part Vegenaise with a little more lemon juice if you want it even more sour creamy like)
1-2 cups Cheezy Sauce (depending on how "cheezy" you want it)
3 Tablespoons coconut oil
2-3 slices of whole wheat bread


Place the frozen hash browns into a 9x13 pan or larger (you may want to put these out a little ahead of time to thaw a bit it will decrease how long they will need to cook). In a medium sized saucepan make the Cream of Something Soup. In a meduim sized bowl combine the Sunflower Seed Sour Cream, Cheezy Sauce, and the completed Cream of Something Soup. It's great to have it still be warm because it will melt the other sauces and since I usually have some of these made up in my fridge they are cold and need to be melted so they mix together well. Take the mixture in the bowl and pour over the hash browns. Mix well to coat. In a small pan melt the coconut oil crumble the bread into the melted coconut oil and stir until the bread soaks up the oil. Sprinkle the bread crumbs on top of the potatoes. Bake at 375 degrees for about 40 minutes until warmed all the way through and the bread is browned on the top.

Thursday, March 26, 2009

Comforting Dinner and a Sneak Peak!

Hey there I hope you are all as excited as I am about my sister Emily posting some of her Simple, Healthy, Tasty recipes here! I promise you will not be disappointed and she should liven things up here a bit too! ;) I just wanted to share a few things. We are having a bit of a cold spell here and below you will see a very tasty, warm and comforting meal I made the other night. Maybe you can try it too! Then I just thought I would give you a sneak peak at what I have been working on!

Cauliflower Curry Soup with Salad and Bread Sticks!

MMmmmMMMmm! Here it's almost dinner time you may need these links!
I garnished it with chives and roasted slivered almonds! Oh so tasty!
These and very Simple and very Tasty! Make sure your water is warmed between 110-120 degrees but NOT more then that! And this time I used agave instead of honey and dipped them in melted coconut oil mixed with a drop of butter flavor and sprinkled the tops of them with onion powder, granulated garlic, and a little sea salt!
The salad was mostly just some dark leafy greens!


Now here's just a little peak at what I have been working on!


Can you guess what it is? And could it possible be good for you and your family?!?!


Would you believe me if I told you it was dairy free and very creamy and Ummmm more than Tasty it's down right YUMMY! ;) (Yeah that's a hint any guesses? I should have the recipe perfected to post by next week! I bet you can't wait!)

Wednesday, March 11, 2009

Whole Wheat Apple Cinnamon Muffins

I have been wanting to add some Healthy, Tasty, muffins to my recipe favorites. These would make great grab and go breakfasts or snacks! My kids loved them! I can't decide which was better the smell of them cooking or the taste of them! They are super moist and oh so comforting!


Whole Wheat Apple Cinnamon Muffins

2 cups whole wheat flour
1 teaspoon baking powder
1 teaspoon baking soda
1/4 teaspoon sea salt
1 tablespoon cinnamon
1/2 cup coconut oil melted (or 1/4 cup applesauce and 1/4 cup coconut oil)
3/4-1 cup Sucanat (depending on how sweet you like it)
Substitute for 1 egg flax or egg replacer both work good
1 cup rice or almond milk mixed with 1 Tablespoon Apple Cider Vinegar
2 large apples, peeled (optional), cored, and coarsely chopped

Preheat the oven to 450°F. Mix together the flour, baking powder, baking soda, salt, and cinnamon, and set aside. In a separate bowl, cream the oil and Sucanat. Beat until fluffy. Add the egg substitute and mix well. Mix in the rice milk mixture gently. Stir in the dry ingredients and fold in the apple chunks. Divide the batter evenly among the prepared muffin cups. Sprinkle the unbaked muffins with some Sucanat and cinnamon or homemade granola. Bake for 10 minutes, turn the heat down to 400°F, and bake for an additional 5 to 10 minutes, or until a toothpick inserted into the center of a muffin comes out clean. Cool the muffins for 5 minutes in the pan, then turn them out onto a wire rack to cool completely.

Saturday, January 17, 2009

Cauliflower Curry Soup

My husband says this is quickly becoming his new favorite soup! He would prefer it if I doubled the amount of cayenne but the kids eat it better if it is less spicy! But if you like it with more of a kick feel free! If you want it a bit thicker you could add another potato or decrease the amount of water. I really love it garnished with a few toasted slivered almonds and a dash of nutmeg! MMMmmMMMMmmMMmmmm! So Tasty on a cold winter night!


Cauliflower Curry Soup

1 tablespoon coconut oil
1 tablespoon olive oil
1 medium onion, roughly chopped
1 tablespoon curry powder
1/8 teaspoon cayenne pepper
1 head cauliflower, cut in florets
2 medium potatoes, peeled and cut in chunks
6 cups water
1 1/2 Heaping Tablespoons vegetable bullion
1 teaspoon sea salt


Garnish options

parsley and/or chives
roasted sliced or slivered almonds
a dash of nutmeg


Heat oils in soup pot. Stir in onion and cook over medium heat until onion softens a bit. Stir in curry and cayenne, mix well and cook for a minute. Stir in cauliflower and potato, toss to coat with curry mixture and saute for two minutes, stirring. Add water, bullion and salt. Bring to a boil. After it starts boiling, lower heat and simmer until cauliflower is soft, about 20 - 30 minutes. Let cool slightly. Using a slotted spoon (I like using my slotted spaghetti spoon) scoop out the veggies and puree them in the blender. If you like some chunks don't spoon all the veggies in. After vegetable have been pureed return the to the liquid in the pot, combining with a whisk. If it has cooled to much you may reheat at this point but usually mine is still plenty warm.

Special tip for those who......Well you know who you are! ;)

The picture above shows me using my slotted spaghetti spoon to put the vegetables into the blender with VERY LITTLE if any liquid. If you have a smaller blender it may take doing it twice. But I think if you just be sure your veggies are cooked well and push them down into the blender it should be okay. The blender should be able to puree the veggies up nice and smooth without having to add much if any of the broth. If it seems to be struggling add a little of the broth but only as little as needed to blend well. Doing it this way should keep hot liquidy (yes that's probably a word I made up but you know what I mean so it must be a word;) soup from building up pressure and popping the lid off and getting all over you. Since most of the liquid is left in the pot you should just get a nice thick puree with no mess. I have also done this with the Creamy Vegetable Soup and found it is much easier than trying to add all the liquid. All the hot liquid just makes blenders want to become volcanoes! And most of us don't want to just blend one cupful at a time! Adding the puree back to the broth and just using a whisk to stir it still makes it a nice consistency but also give you the option to leave some vegetable chunks if you want!

Monday, December 22, 2008

Lime Rice

This is very Simple and oh so Tasty! We love it on taco salad or in burritos! It's also a great side dish! Sorry I don't have a picture it pretty much looks like cooked rice. ;)


Lime Rice

3 cups COOKED brown rice
2 Tablespoons coconut oil
zest of 1 lime
juice of one large lime
1 teaspoon sea salt
2 Tablespoons Sucanat
1/2 cup fresh chopped cilantro (optional)


Heat all ingredients except the cilantro, in a pan on the stove. When it's warmed through and well mixed remove from heat and stir in the cilantro if desired!

Saturday, December 6, 2008

Apple Cinnamon Swirl Bread

This year for Christmas we are in the homemade mood! We are making gifts and even ornaments for our tree.

We made some applesauce cinnamon spice ornaments that smell oh so good!


Then we soaked some sliced apples in a mixture of water, lemon, and salt and sprinkled them with cinnamon and put them in the dehydrator. Oh the smells were so good!! I was wishing they weren't just for the tree!

I decided we must make something edible that smelled that good! So here you have it Apple Cinnamon Swirl Bread! It was super Simple and it is very very Tasty! Of course I don't need to mention it's also Healthy! ;)

Apple Cinnamon Swirl Bread

Here is what I did! I used my Best Yet Whole Wheat Bread recipe, only I added 1/4 cup Sucanat when I put in the honey for a touch of extra sweetness. Just so you know this is still bread not cake. If you want it more like cake you will have to figure that out. I really like the not too sweet but sweet enough home cooked bread flavor! ;) I let the dough rise in the bowl until double and while it was rising I chopped up a couple of apples I didn't bother to peel them. After the bread had rose I punched it down and split it in half. I took the first half and made a loaf width rectangle then I sprinkled it with some Sucanat and cinnamon then I put some of the chopped apples on top of that sprinkled with a little more Sucanat and cinnamon then rolled it up and shaped it into a loaf and put it in a loaf pan. Then I did the same thing with the other loaf only I added a few raisins with the apples. I then set them in a barley warm then turned off oven to let rise until double again. Once they rose I turned the oven on to 350 degrees and baked them for about 35 minutes or until golden brown. It's a great twist on your same old whole wheat bread and fills the house with wonderful scents!

About This Blog

  © Blogger template Simple n' Sweet by Ourblogtemplates.com 2009

Back to TOP